Production World was fortunate enough to get our hands on a Blackmagic Design URSA production video camera recently, and we had some early impressions. The first is that this is a tripod camera. The rumor mill told us that the URSA was heavy, but the 16.6 or so pounds of non-outfitted camera feels different heavy. Like, crazy heavy. Add some glass, a v-mount plate and battery, and the camera easily ventures north of 20 pounds.
This can be an issue on a number of fronts. Our tester was given to us to use in a run and gun environment. It’s not going to be the fun, light 5D Mark III with Atomos Ninja 2 kit we had in mind, but it should be possible if we’re creative.
Our first thought was to use the Blackmagic Design shoulder mount kit. A shoulder cushion and front plate mount with morettes gave the option to add arms and balance this beast on our poor, unsuspecting shoulder. The issue is that the camera sits centered on the shoulder to keep the weight in a manageable spot over the body, which lines up the lens mount right around mid-cheekbone. The issue then becomes how instantly useless the beautiful ten-inch monitor becomes. An electronic viewfinder could be an option, but the big URSA has no HDMI out, so expensive SDI EVFs are the only option.
Next option is a tripod. Running and gunning with a tripod isn’t the end of the world, but our reviewer is recovering from a broken wrist. Weight, long runs between interviews, and a lack of budget for peripherals kicked in, and a new option needed to be figured out.
Fortunately, we discovered the secret to running and gunning with an URSA. The secret is attaching a heavy duty monopod directly to the plate thread on the bottom of the URSA. Ditch the head and screw that bad boy right on the bottom. Light? No. Manageable? Yep. Sorta.
The screen stays in play, the camera is very stable, and the head isn’t really missed on a monopod.
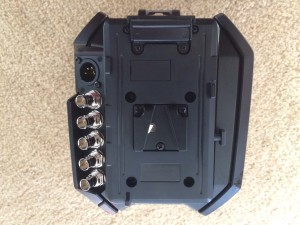
Our next impression came when we were mounting the V-Mount battery plate to the rear of the camera. The beautifully machined aluminum body panels promised a simple and accurate job ahead. Unfortunately, this didn’t prove exactly the case.
Covering the camera’s molex attachment was a small cover secured with four T6 Torx screws. At least, that’s what we were told they were. What they ended up being was a bunch of tiny, super-soft screws that were prone to instant stripping, even when good tools and great care were used.
What we ended up doing was probably not the most recommended practice. Using high end electronics torx drivers we got two of the four screws out and stripped the other two hopelessly. The staff at Lowe’s didn’t have any round-head screwdrivers, so our options were limited.
Some perusal of the Blackmagic forum delivered a few creative approaches existing URSA owners had done, from drilling the screws out to simply removing the entire back plate from the camera and duct taping the V-Mount plate directly to the camera.
To be honest, the duct tape idea was sounding pretty good, but there was one last possibility. We removed the large back plate of the camera to gain access to the rear of the molex plug cover. We wedged a slotted screwdriver against the panel and applied as much pressure as a human can generate. This bent the lid enough to get the same screwdriver under the plate from the other side. We then crowbarred the plate up until the plate bent and lifted over the remaining two screw heads.
Even without a plate attached the screws were Loctite-ed in place pretty severely. Considering we would never really need to remove the V-Mount plate, we simply attached it right over the two remaining screws, plugged it in and were done.
A bit of odd engineering, no doubt, but once we were powered up the amazing 4K image of the URSA quickly erased any harsh feelings toward the beautiful camera.


Leave a comment